Dehydration feels awful. It can cause headaches, low energy, nausea and more. Many common conditions such as pancreatitis, kidney disease, and inflammatory bowel disease (IBD) cause dehydration in cats and dogs. For mild to moderate dehydration, you can learn to hydrate your pet at home. In this article, I am going to walk you through how to give your pet subcutaneous fluids.
Your veterinarian can help you decide when subcutaneous fluids are right for your pet. For severe dehydration or uncontrolled vomiting, hospitalization with intravenous (IV) fluids may be necessary. Your veterinarian will also be the best person to decide how much fluids to give and what type. They will also be able to supply you with all the equipment in this article.
The first time you administer fluids, I recommend finding somebody that can help you. After a couple of times, you will most likely feel like a pro, and feel comfortable enough to do it alone.
STEP 1
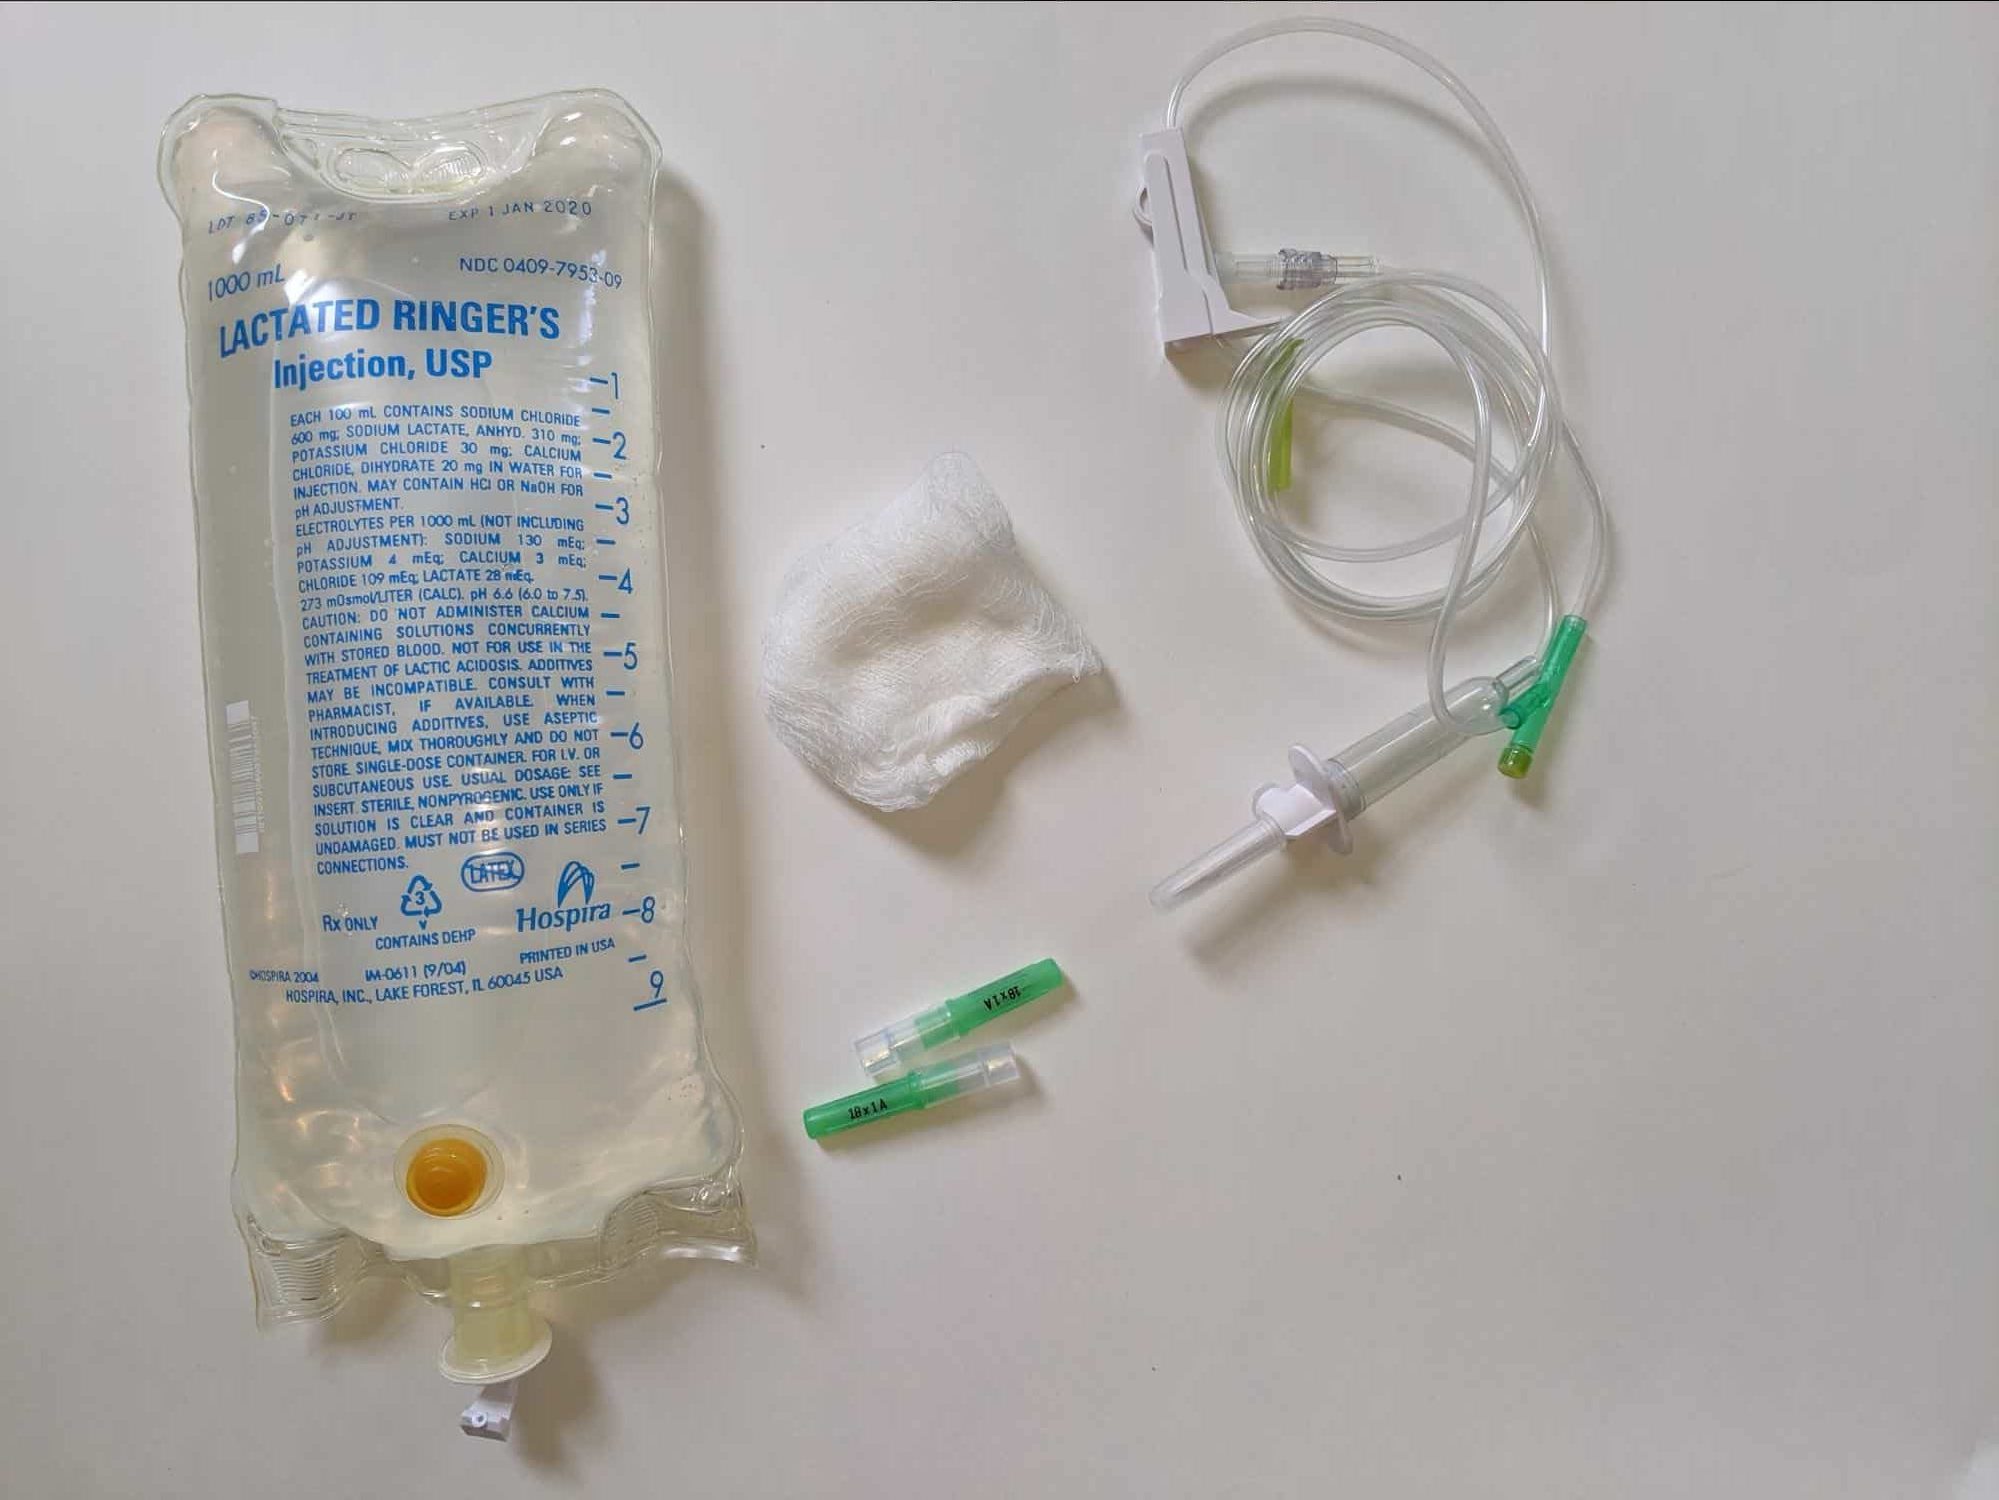
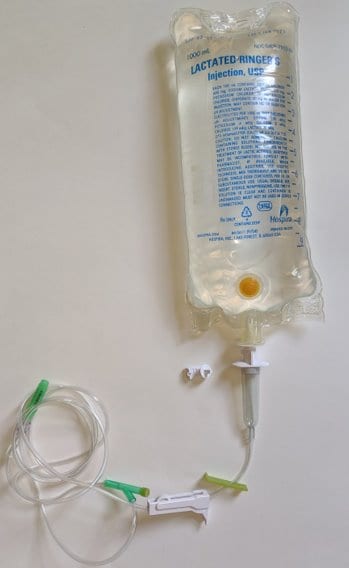
Gather all the equipment you need:
- Fluid Bag
- Fluid line
- Needles
- Paper towel or gauze
STEP 2
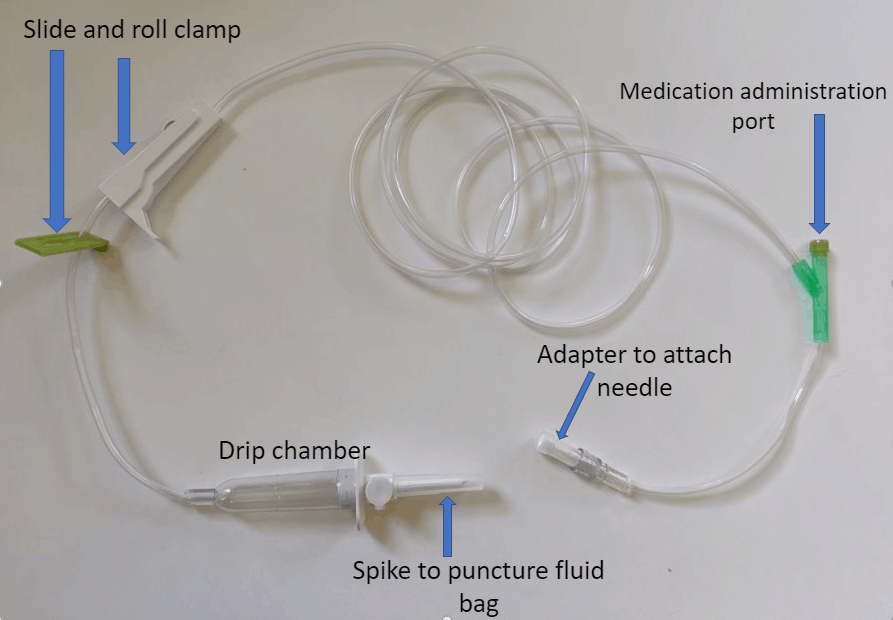
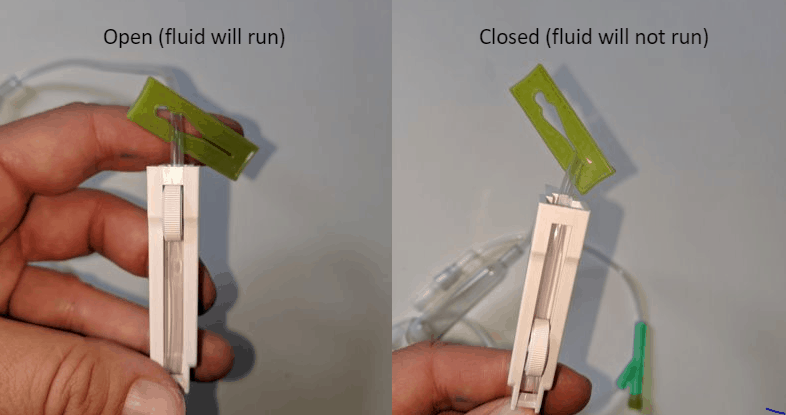
Take a look at the fluid line and compare it to the pictures below, so you become familiar with it. The roller clamp and slide clamp are the two pieces you can use to stop and start the flow of the fluids.
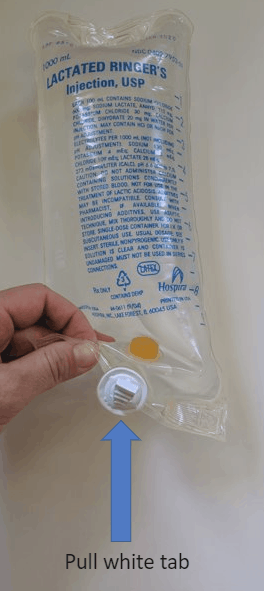
STEP 3
Close either the roller clamp or slide clamp. Remove the rubber piece from the fluid bag that is protecting the entry port, by pulling the tab. Then remove the plastic cover over the spike which you will puncture the bag with. Puncture the bag with the sharp end of the fluid line by inserting into the port.
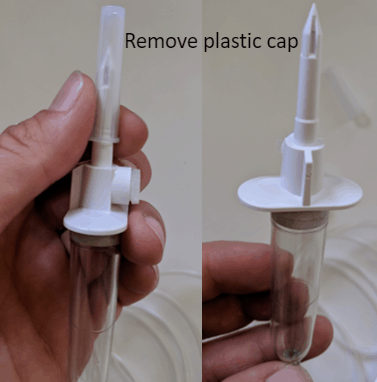
STEP 4
Walk over to a sink with your fluid bag that now has the fluid line attached. Remove the plastic cap from the needle adapter. Open the roller clamp and slide clamp. Hold the bag upright and allow fluid to run completely through the line until it comes out into the sink. Once your fluid has run completely through the line, close either the roller clamp or sliding clamp.

STEP 5
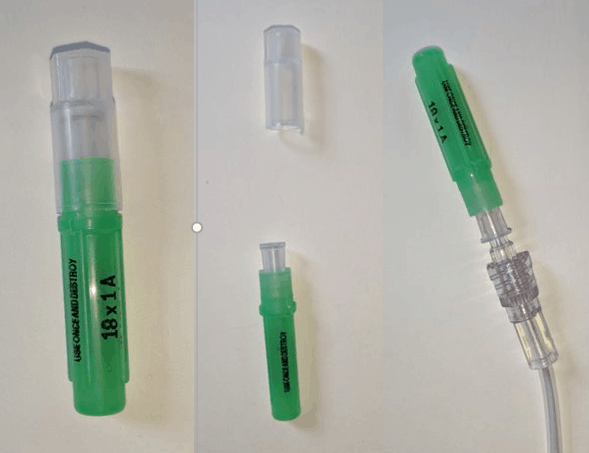
Attach the needle to the fluid line by first removing the plastic cap on the bottom of the needle and then by twisting the needle onto the needle adapter. Keep the cap over the sharp end of the needle on until you already to administer fluids. Change the needle each time you administer fluids, a dull/used needle will feel uncomfortable to your pet. I usually leave the used needle on, until the next I am administering fluids. Ask your vet on how to properly dispose of the used needles.
STEP 6
Find an area your pet will be most comfortable. I recommend laying down a towel or blanket if your pet will be on a hard surface. If your cat is happiest in your lap, or your dog prefers their bed, that is fine! Treats are encouraged!
- TIP: Having a second pair of hands (one pair to hold the fluid bag and one pair to hold your pet) is helpful, but not imperative. Alternatively, if you have an area to hang the bag such as a door handle, cupboard handle or clothes hanger, this can make things easier for you when flying solo! Just make sure the bag, regardless of where you give fluids, is suspended above your dog or cat.
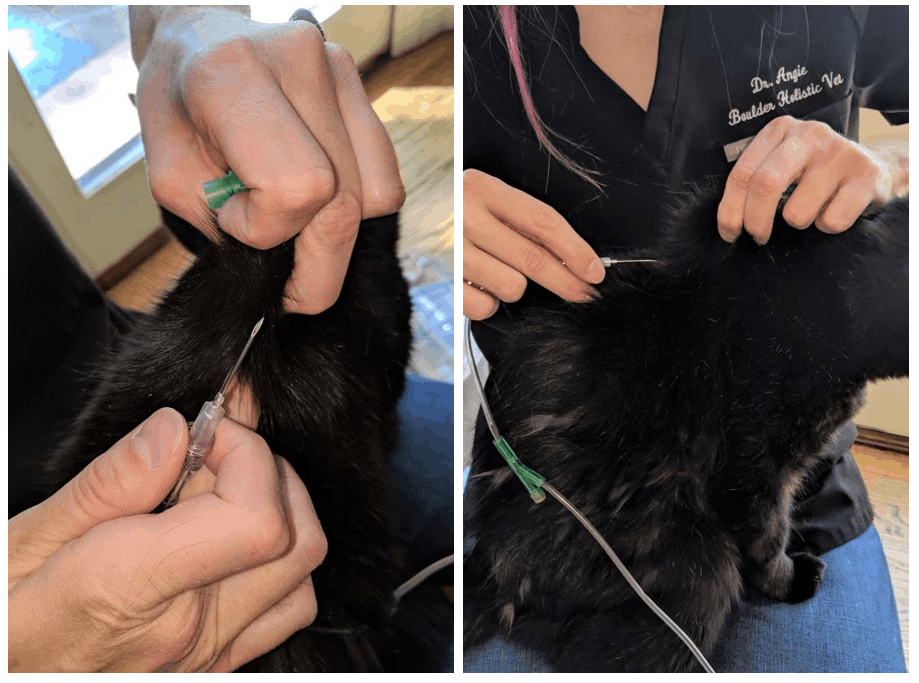
STEP 7
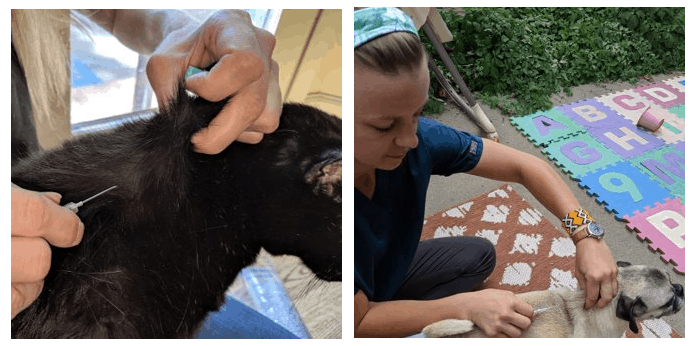
Now that your pet is comfortable and your fluid bag is prepared, you are ready to administer fluids. Remove the cap covering the needle. One hand should hold the needle at the base while your other hand lifts your cat or dog’s scruff to create a ‘tent’. The scruff is the area between their shoulders. Gently and smoothly insert the needle into the ‘tented’ area. The needle should be inserted parallel to your dog or cat’s back.
- If you are administering a very large volume of fluids, make sure you discuss with your vet whether the entire volume can be administered to one area. Sometimes your vet may recommend inserting fluids in more than one pocket.
STEP 8
Once you have inserted your needle, check and make sure you didn’t poke through the other side (if you did, don’t panic as this is a common mistake that even nurses sometimes make!). If this does happen, gently remove the needle from the skin, replace the needle with a new one, re-tent the skin, and re-insert your needle.
STEP 9
Release the skin once the needle is properly in place. You may need to hold the base of the needle to keep it under the skin while you administer fluids.
STEP 10
Open your rolling or sliding clamp. Fluids should be flowing smoothly. If they are not, you may need to raise the bag higher or slightly reposition the needle. You may also apply pressure by squeezing the bag with your free hand to make the fluids come out faster. If you have a second person helping, they can squeeze the bag for you.
- Note that a large fluid bubble may build under your pet’s skin. This is completely normal! The bubble should dissipate in the next couple of hours, as your pet absorbs the fluids.
STEP 11
Once you have administered the fluid amount recommended by your vet, close the clamp to stop the flow of liquid. Grab the needle by the base, and gently slide parallel and out from the subcutaneous space. Replace the needle cap.
- Apply pressure to where the needle was inserted by gently pinching the skin for approximately 30 seconds. This will help liquid from oozing out of the needle insertion site. If you do see some liquid leak out, don’t worry as this is normal. Sometimes after administering fluids, your pet may bleed a little at the needle insertion site. If this happens use the gauze or paper towel to apply pressure until the bleeding has stopped. You’ve done nothing wrong, and it will stop bleeding within minutes! I find this always happens to animals with white coats!
STEP 12
Lastly, store the used needles somewhere safe and return to your vet so they can properly dispose of them.
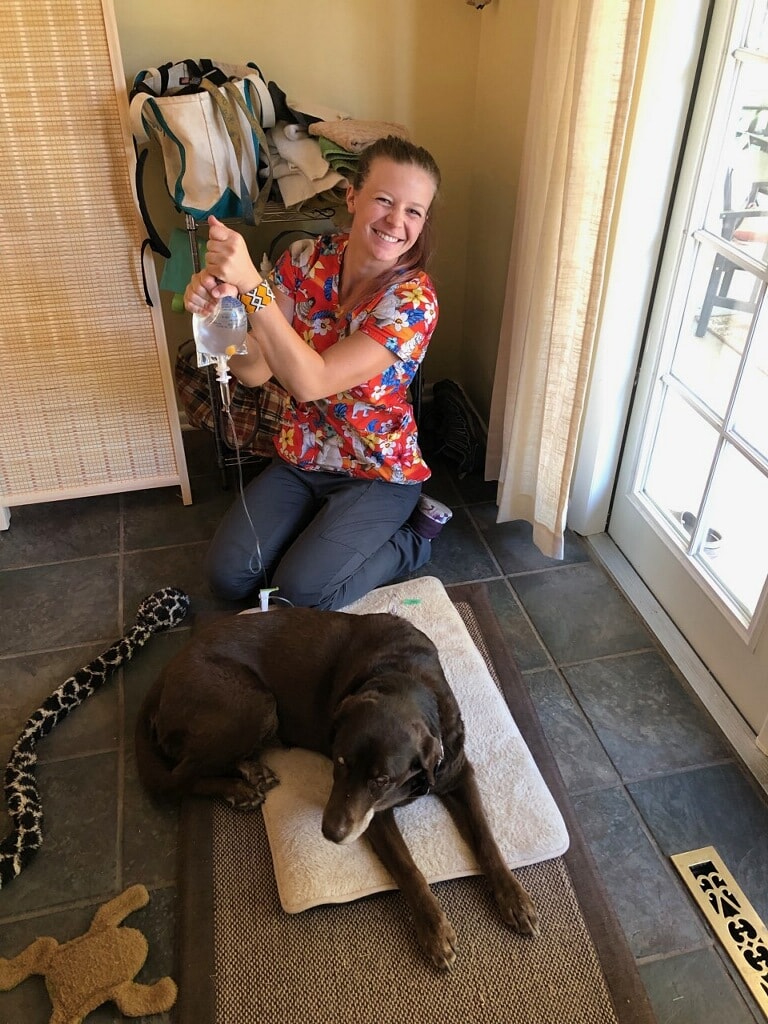
Check out our sweet patient, Daisy, receiving some fluids! I hope this blog helps! If you still have questions,I’d love to hear them. Just leave me a comment below!
Madison


11 thoughts on “How to Give Subcutaneous Fluids to Your Pet”
My Nordic Spitz (Nora) needs daily subcutaneous hydration due to kidney disease. We have been doing it at home for about 4 months now. Our problem is that there is often bleeding at the injections site after the treatment. When bleeding occurs it takes 3-4 minutes to stop. Is it possible that I’m doing something wrong in the needle placement. She doesn’t have a really loose scruff, so I haven’t been “tenting” as described, just trying to find a spot that feels right for the injection. Any help appreciated – blood doesn’t look good on white fur 😉
MikeH
Hi Mike,
I’m so sorry for this delayed response!
I’ve had this happen before too.
Just a couple of questions –
1) Where are you inserting the needle? Are you using the area between her shoulder blades (where mama cats carry there babies)?
2) What size needle are you using? I’m wondering if she may need a smaller needle, although this will slow down the speed of the fluids.
I hope this helps! Keep me posted!
Warmly,
Claire
Very good information. One tip that helped me so far is to warm the fluid a little. I place a hotpack over it and the prepped tubing for a few minutes to take of the chill, and my cat seems to tolerate it better. One question is what to do when your cat has lost so much weight as mine has. It’s almost impossible to pull up her skin, and scarier that I will touch a nerve and cause her pain. All I can say is that kidney disease in cats is awful. My baby has gone downhill so fast and I’m desperate to help her. Vets need to be more proactive in detecting it early. Vomiting has been the main symptom with the three cats I’ve had with it, and the vets always dismiss it and say to come back later. I finally demanded blood work for the one that’s so ill now , and it was shocking to find out how advanced her illness was. I was very unhappy and really annoyed to say the least! I will start home therapies in the futurefor my other cat after he turns ten or so, just to be on the safe side. Maybe I could have avoided what’s happening to my baby tonight..
Hi Angela,
Yes! I DEFINITELY recommend warming the fluids. Such a huge suggestion, thank you for bringing that up!
You are so right, kidney disease is a sad disease for cats. And, so common. 🙁
You are doing a fantastic job, I can feel it.
With love,
Claire
My cat was diagnosed right before she turned ten. Actually, ace had bloodwork two years prior and she didn’t have kidney disease so I guess it can be be quick. She’s had pancreatitis for years though. I’ve been doing the subQ IV for five months. She hasn’t really been getting worse but she has t been back to the vet and they never said what stage she’s at. They call it “end of life care” though .
My cat was diagnosed right before she turned ten. Actually, she had bloodwork two years prior and she didn’t have kidney disease so I guess it can be be quick. She’s had pancreatitis for years though. I’ve been doing the subQ IV for five months. She hasn’t really been getting worse but she hasn’t been back to the vet and they never said what stage she’s at. They call it “end of life care” though .
Hi Laura,
I am so sorry to hear this. It must feel so stressful. Lab work at any one point in time by itself is impossible to label as end of life care. Can you take her back to have her numbers rechecked? I would be so interested to know what her creatinine and phosphorus are.
Sending you a big hug,
Dr. Angie
Thank you so much for this good & easy to understand information. My sweet little kitty & I really do appreciate it!
I’m so glad they have been helpful tips for you and your sweet little kitty!!
Lots of love,
Claire
I have had to give S.C. fluids to a number of my kitties over many years. This is probably the most comprehensive explanation I have seen over the Internet. Love the photos. I hope many newbies find your article! Just wanted you to know your efforts are appreciated.
Hi Babette!
Thank you so much for the kind words! We are so glad we can help:)
Best,
Madison